Tag Archives: Fix

Disable Cortana in Windows 10

Windows 10 has been updating the search to only use Cortana, Microsoft’s digital assistant. This assistant might be useful to you and Microsoft has put a lot of time in making Cortana reasonable to use.
Some people would rather have the good old basic search that only shows the programs and the files on your local computer without all the web results and options fro the assistant. Recent updates from Microsoft have change the location of the settings so that you must sign in to Cortana in order to disable options like ‘Show Web Results‘.

There is a way to disable Cortana and change her back to a dumb search box for your system with a few simple edits to the windows registry. Be warned that changing the registry can have major impact on your systems stability if you are not careful.

Continue reading

Remove Suggested Apps from Windows 10 by Registry

If you need to remove the new suggested applications option from the Windows 10 Start Menu, and you need to push this change to a large install base of managed systems you have a few options.

You can create a GPO to disables the feature if you are managing a domain, or you can modify the registry if you are using a Remote Management Suite to manage several domains and/or workgroups.

Here is the registry value to disable the suggested applications.
[HKEY_LOCAL_MACHINE\SOFTWARE\Policies\Microsoft\Windows\CloudContent]
"DisableWindowsConsumerFeatures"=dword:00000001

This command can be run from an admin command prompt to set the registry setting.
REG ADD HKEY_LOCAL_MACHINE\SOFTWARE\Policies\Microsoft\Windows\CloudContent /v DisableWindowsConsumerFeatures /t REG_DWORD /d 1 /f

Event ID 4319 NetBIOS over TCP/IP with Dual Nic’s

We have received many alerts on the error Event ID 4319 as seen below.
Event log: System
Event Source: NetBT
Event ID: 4319
Message Contents: A duplicate name has been detected on the TCP network.
The IP address of the computer that sent the message is in the data.
Use nbtstat -n in a command window to see which name is in the Conflict state.
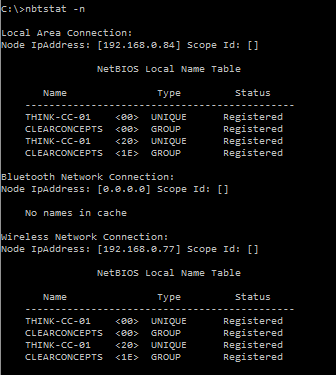
netbios-nbtstat

View of the nbtstat -n command result

The cause of this issue has been systems that have more than one network card, this is more common in laptops that will use a hardline in the office. you can see this by using the command ‘nbtstat -n’ multiple network cards have the same NetBIOS name.

To correct this behavior you could prevent both network cards from connecting at the same time, although that is not a viable tactic to us. What we have decided to do is disable NetBIOS over TCP/IP on the wireless card.  If you are doing this remotely you can run the following commands.

First you will need to know what the index number of your network card is, you can retrieve that with the following command.

wmic nicconfig get caption,index,TcpipNetbiosOptions

netbios-nicindex

View of the network cards and the index numbers

You can see the index number listed next to each network card name, in this case we are looking for the wireless card, that would be index number ‘2’. You can also see the TcpipNetbiosOptions column is showing a ‘0’, that means it is set to DHCP server options or fail over to enabled if DHCP has no options set. we will need the TcpipNetbiosOptions value to be ‘2’ to disable NetBIOS over TCP/IP, and with the index number we can run the following. (Change the index to the nic relevant to your issue.)

wmic nicconfig where index=2 call SetTcpipNetbios 2
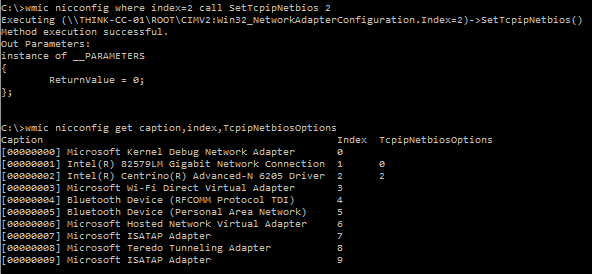
netbios-settcpipnetbios

Result of setting NetBIOS over TCP/IP off.

Error: The application failed to initialize properly (0xc0000135)

If you are getting the error “The application failed to initialize properly (0xc0000135). Click on OK to terminate the application.” when you are launching an application you do not have the .NET Framework installed.

You can go to http://www.microsoft.com/en-us/download/details.aspx?id=22 to download the .NET Framework from Microsoft.

This can be an issue with XP systems as they do not come with .NET Framework by default, most Vista and newer systems will have .NET Framework 3.5 SP1 installed by default. Please remember that .NET Framework 4.0 is not backwards compatible with .NET Framework 3.5.

MS13-036 Security Update KB2823324

This patch has several issues and should NOT be installed on your system at this time.
If you have installed this patch it is recommended that you remove this patch before you reboot.

This patch has been causing the Event ID 55, or a 0xc000021a Stop error in Windows 7 upon rebooting. If you are using Kaspersky as your Anti-Virus this patch will cause Kaspersky to fail to load properly causing it to report a failure with your license. After you have removed the patch you will have to revalidate your Kaspersky install.

Please refer to http://support.microsoft.com/kb/2839011 for more details.

If you wish to script the removal of this patch you can do so using the following command:

%SYSTEMROOT%\system32\wusa.exe /uninstall /kb:2823324 /quiet /log /norestart

You can also use DSIM to remove the patch with the following command:

32 Bit
dism /image:C:\ /remove-package /PackageName:Package_for_KB2823324~31bf3856ad364e35~x86~~6.1.1.1
64 Bit
dism /image:C:\ /remove-package /PackageName:Package_for_KB2823324~31bf3856ad364e35~amd64~~6.1.1.1

Ghostscript Setup Windows 8 64 bit

If you are supporting custom software or older line of business software that your organization needs to operate you might come across an issue with Ghostscript and windows 8 64 bit.

The issue is simply when you try to add the Ghostscript printer windows 8 will look like it is stuck in a loop, if you check the error logs you will find an error that look like this.
Log Name: Application
Source: Windows Error Reporting
Event ID: 1001
Level: Information
Description:
Fault bucket -1485095716, type 5
Event Name: PnPDriverImportError
Response: Not available
Cab Id: 0

Problem signature:
P1: x64
P2: E000022F
P3: ghostpdf.inf
P4: 9fa1429c89509ac5eb7661ffa0fa86850304a1fd
To install the Ghostscript printer follow these steps:

  1. Open your charms (the right side popup menu) and select “Settings” and Click on the last option on the list called “Change PC Settings”
  2. In the “General” category click the “Restart now” button under “Advanced startup”
  3. Then the system restarts it will show you several options, you want to select “Troubleshoot” then “Advanced options” and finally “Startup Settings”
  4. The system will reboot one more time and you will have a new listing of options, you will want to select option #7 “Disable Driver Signature Enforcement”
  5. After the system has finished restarting for the final time you will be able to add the Ghostscript printer to windows 8 64 bit.

The final item of note is that you must select “File: (print to file)” as the port for the printer as “LPT1” will not work.

You can download the latest version of Ghost script from this website http://www.ghostscript.com/.

Set Server 2012 Network Location

After setting up Server 2012 to test with, I had a major issue with the network location. I was not able to change from the network location from “Public network” to “Private network”. I could get around this issue by join the server to a domain, and doing so would set the network location to “Domain network”. Although this solution might not be ideal or even possible for some people.

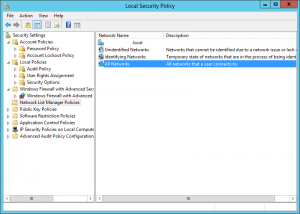
Local Security Policy

If you can not join the system to a domain or do not wish to join the system to a domain you will have issues accessing the system through the network connection. Now if you were to set the network location to “Private network” you would be able to access the system like a domain joined system.

Follow these steps to be able to change the network location:

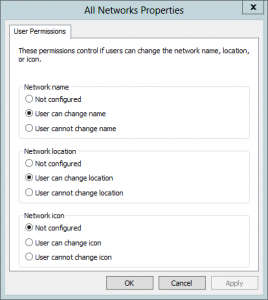
All Networks Properties

  • In “Server Manager” open the “Tools” menu and select “Local Security policy”.
  • Select “Network List manager policies” in the console tree.
  • Open “All Networks” properties.
  • Change “Network location” to “User can change location”
  • Now reboot to apply the changes.

In the “Local Security Policy” editor you can also change the network type of your network if it listed by editing the properties of the listed network instead of the “All Networks” option.

Update: 
Several people have pointed out that this option can be done with the following Powershell commands.

Get the list of network profiles on the system.
Get-NetConnectionProfile
Change the network interface to private, use the network interface index number from the previous command.
Set-NetConnectionProfile -InterfaceIndex 10 -NetworkCategory Private

Windows Installer Failure

I was working on a server doing some cleanup of old applications when I was suddenly not able to uninstall or install applications anymore. I would get an error about the Windows Installer Service failing. I have a quick glance at the event logs and found this gem of an error:
Event Type: Warning
Event Source: MsiInstaller
Event ID: 1015
Description:
Failed to connect to server. Error: 0x8007041D

This error does not give a huge amount of details, but according to Microsoft it translates to “The system cannot find the path specified“. 

I tried several fixes including running the following commands. You must have the services console closed or it will not properly reset the service.
msiexec.exe /unreg
msiexec.exe /regserver

This did not correct the issue, I next found a direct uninstall command and executed it manually from the command line adding logging to the the command to see what the installer service was having an issue with.
c:\Windows\System32\msiexec.exe /i {ProductCode} /L*v c:\temp\msiexeclog.txt

This returned the following error code:
MSI (c) (44:98) [16:16:41:018]: MainEngineThread is returning 1601

I have now reached the point that it looks like reinstall of the Windows installer would be the fastest solution, to do this I first cleaned the old installer from the system using the following commands.
cd %windir%\system32
attrib -r -s -h dllcache
ren msi.dll msi.old
ren msiexec.exe msiexec.old
ren msihnd.dll msihnd.old

After restarting the system I downloaded and installed a new copy of the Windows Installer from Microsoft. After one more reboot I was able to continue application uninstalls on the server.

SBS 2011 Backups Failing

Recently I was working on a SBS 2011 box and the system would not let me make changes to Shadow copies for the drives. I would make a change to the settings and it would report an error and would not save my settings. After poking at the system a bit I found that the VSS services have reported an issue.

Level: Warning
Source: VSS
Event ID: 8230
Log Name: Application
Volume Shadow Copy Service error: Failed resolving account spsearch with status 1376. Check connection to domain controller and VssAccessControl registry key. Operation: Initializing Writer Context: Writer Class Id: {368753ec-572e-4fc7-b4b9-ccd9bdc624cb} Writer Name: TS Gateway Writer Error-specific details: Error: NetLocalGroupGetMemebers(spsearch), 0x80070560, The specified local group does not exist.

The system had added SharePoint Users to the VSS registry entries. Running the SharePoint update with force cleared this error.

  1. Open an Administrative command prompt
  2. Change directory to C:\Program Files\Common Files\Microsoft Shared\Web Server Extensions\14\BIN
  3. Run “PSConfig.exe -cmd upgrade -inplace b2b -force -cmd applicationcontent -install -cmd installfeatures”