Monthly Archives: September 2012

Set Server 2012 Network Location

After setting up Server 2012 to test with, I had a major issue with the network location. I was not able to change from the network location from “Public network” to “Private network”. I could get around this issue by join the server to a domain, and doing so would set the network location to “Domain network”. Although this solution might not be ideal or even possible for some people.

Local Security Policy

If you can not join the system to a domain or do not wish to join the system to a domain you will have issues accessing the system through the network connection. Now if you were to set the network location to “Private network” you would be able to access the system like a domain joined system.

Follow these steps to be able to change the network location:

All Networks Properties

  • In “Server Manager” open the “Tools” menu and select “Local Security policy”.
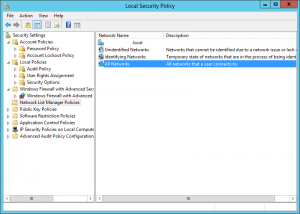
  • Select “Network List manager policies” in the console tree.
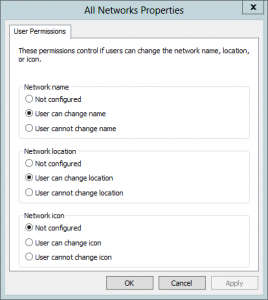
  • Open “All Networks” properties.
  • Change “Network location” to “User can change location”
  • Now reboot to apply the changes.

In the “Local Security Policy” editor you can also change the network type of your network if it listed by editing the properties of the listed network instead of the “All Networks” option.

Update: 
Several people have pointed out that this option can be done with the following Powershell commands.

Get the list of network profiles on the system.
Get-NetConnectionProfile
Change the network interface to private, use the network interface index number from the previous command.
Set-NetConnectionProfile -InterfaceIndex 10 -NetworkCategory Private

Domain Joins from PowerShell

I have been working in Kaseya a bit and I have had issues with domain joining systems and rejoining systems to domains. I would have even liked to rename systems if I could. After searching and testing many different ideas I have com across PowerShell’s way of domain joining systems.

Help for Add-Computer in Powershell

In Powershell V2 there is a new cmdlet called Add-Computer and it has more power than the GUI version of the domain joining system.
PS C:\> Add-Computer [-DomainName]  [-Credential ] [-OUPath ] [-PassThru] [-Server] [-Unsecure] [-Confirm]
PS C:\> Add-Computer [-WorkGroupName] [-Credential ]

The command below I will be joining the domain “testdom.local” and have already said what account I want to use to do this. This will result in the need to enter a password but that is a simple step. The -passthru switch will give me some basic details about the domain join.
PS C:\> Add-Computer -domainname testdom.local -cred testdom.local\administrator -passthru
You can even specify an Orginization Unit using the switch -OUPath if you did not want to move the system to a different OU after it has been joined to the domain.

The place that this is cmdlet great for anyone running a managed service system like Kaseya is when you can remove a computer from a domain and change the computers name and rejoin the domain. To change a systems name you can use the following command.
PS C:\> Add-Computer -workgroup workgroup -newname testsys01 -force -restart
The switch -Force will suppress the confirmation boxes since the cmdlet Add-Computer asks for confirmation on all commands. The final switch will -Restart will do exactly what it says, it will restart the system after it has run since a restart is often required to make the changes effective.

Here is a thought

From van Dijk’s site: Life at the bottom of the city.

Why do you work? Do you work for the excitement, the challenge, or the fun of what you do? Do you feel good about what you do at the end of the day? Would you take a pay cut and be just as happy?

Or do you work so that you have currency? Do you work to feed your self and your families? Could you replace your job with any other job as long as you get more currency?

I wonder if socialist ideas do not fail because they are flawed but because society is flawed. Why is the idea of a guaranteed standard of living a bad thing? Why would you stop working if you had a guaranteed standard? Is it the fact that your work basically pushes you to work harder, does not care about your stress levels, and just want a more productive you?

Futuristic city concept art by Andrea, Italy.

I think you should work because you like what you do and you feel productive. I think we should all strive to make everyone feel better and live better. The world should not be a few rich standing on the backs of the lesser.

No I do not think you should give all your currency to charity and you should not have to sponsor children in a third world. Think about all the people that want to help why can we not just work at making everyone have a universal standard of living regardless of location on earth, race, or age.

Remember we are one race, we are one people, we all should all be equal, regardless of your personal view of how much better you are. You are not better you are not worse you are part of us.

Windows Installer Failure

I was working on a server doing some cleanup of old applications when I was suddenly not able to uninstall or install applications anymore. I would get an error about the Windows Installer Service failing. I have a quick glance at the event logs and found this gem of an error:
Event Type: Warning
Event Source: MsiInstaller
Event ID: 1015
Description:
Failed to connect to server. Error: 0x8007041D

This error does not give a huge amount of details, but according to Microsoft it translates to “The system cannot find the path specified“. 

I tried several fixes including running the following commands. You must have the services console closed or it will not properly reset the service.
msiexec.exe /unreg
msiexec.exe /regserver

This did not correct the issue, I next found a direct uninstall command and executed it manually from the command line adding logging to the the command to see what the installer service was having an issue with.
c:\Windows\System32\msiexec.exe /i {ProductCode} /L*v c:\temp\msiexeclog.txt

This returned the following error code:
MSI (c) (44:98) [16:16:41:018]: MainEngineThread is returning 1601

I have now reached the point that it looks like reinstall of the Windows installer would be the fastest solution, to do this I first cleaned the old installer from the system using the following commands.
cd %windir%\system32
attrib -r -s -h dllcache
ren msi.dll msi.old
ren msiexec.exe msiexec.old
ren msihnd.dll msihnd.old

After restarting the system I downloaded and installed a new copy of the Windows Installer from Microsoft. After one more reboot I was able to continue application uninstalls on the server.

Windows 8 and Browsers

I have looked at how to use a browser on windows 8 in a way that feels proper to me. I have found that Chrome works well in Metro mode, but it Metro apps do not support plugins at this time. The good news for Chrome is since it uses pepper flash so will have no problem with flash unlike Firefox.

My issue is that I have dual monitors, this means that I want two browsers open at one time. I have not yet found a way of having two Metro apps open at one time on different monitors. So you might ask why I do not just open my browser in desktop mode? Well when you have a browser set as the default browser in Windows 8 it likes to open in Metro mode when launched from the start menu. I could set a browser that I do not use as the default, but this means that every time I open a link from my email or in a different application it will not open in the browser I want to use.

How to workaround this behavior.

Pin Browser to Taskbar

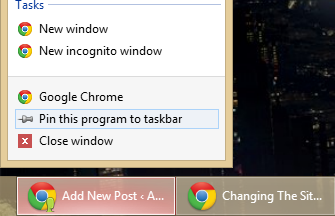
Pin browser to taskbar to open in desktop mode

I have noticed that if you are already in desktop mode when you click on a link it will open in desktop mode not Metro mode. You will still have the problem of opening your browser in desktop mode to start with. What you can do is pin your default browser to the taskbar, and to launch the browser go to the desktop from the start menu and then use the browser pinned to the taskbar instead of the start menu.

Removal of Trend Worry Client/Server Security Agent Manually

I have recently needed to replace the current antivirus on all the workstations at a site. The installed antivirus was Trend WFBS and removal is normally simple except under a few situations.

The first issue is very simple the system is offline. Now all you can do is turn it on and remove it, nothing interesting here unless you are not in the office and doing this remotely.

The second issue is roaming systems, Trend does not let you send commands to a system that is roaming so this will be a small problem if the system never come back to the office.

The third issue is that Trend will not uninstall an agent if Internet Explorer is open on the system. This issue might be simple call the user tell them to close IE and issue the command again. The problem is that the Trend console does not tell you that it had an error uninstalling from the system.

I was able to solve both issue two and three using Kaseya, the management tool that we have installed on all the systems we manage. This was done simply with a custom procedure.

  • Close Internet Explorer, and Firefox.
  • Set the registry key “HKEY_LOCAL_MACHINE\SOFTWARE\TrendMicro\PC-cillinNTCorp\CurrentVersion\Misc.\Allow Uninstall” to the value “1” permitting uninstall without entering the admin password.
  • Run the uninstall agent “C:\Program Files (x86)\Trend Micro\Client Server Security Agent\NTRmv.exe”

After this has run I can now install the new antivirus on the systems, I recommend using Kaseya’s implementation of Kaspersky if you are able.

I have attached the procedure for anyone that wish to have a copy of the procedure.
Procedure Remove Trend Micro Client-Server Security

Setup Windows To Go on a USB Drive

The idea of a windows to go setup for Windows 8 is very interesting and I have wanted to try this as soon as I hear about it. After doing some research and testing I have managed to get a working copy of Windows To Go to work on a 32GB USB drive.

Now I have seen that this is not the fastest thing in the world, but this is because of some simple reasons. The drive I am using is only USB 2.0 not USB 3.0 making it rather slow, as well as the drive is just not that great to start with. I still really like to use the device and it is a lot of fun to use when you’re at someones house and you want to browse or do work but you do not want to use their computer.

You will need the following.

How to setup the drive.

  • From a command prompt
  • Run: diskpart
  • At the DISKPART> prompt find your USB drive by typing: list disk
  • Select your USB drive by typing: select disk 2 (if your drive is listed as drive 2)
  • Prep the drive by typing: clean
  • Now we create a partition: create partition primary
  • The partition needs to be formatted and set as bootable: format fs=ntfs quick
  • Set the drive letter for the partition: assign letter=W
  • Set the partition as active: active
  • Exit diskpart: exit

You will now need to get a file off the Windows 8 DVD ISO and a copy of imagex.exe. To access the files in the ISO I recommend using winrar as it can open ISO files. The file you need is called install.wim and it is located in the sources folder in the ISO, copy this file to your local hard drive I recommend the C:\temp\ as it is simple to access from the command prompt.
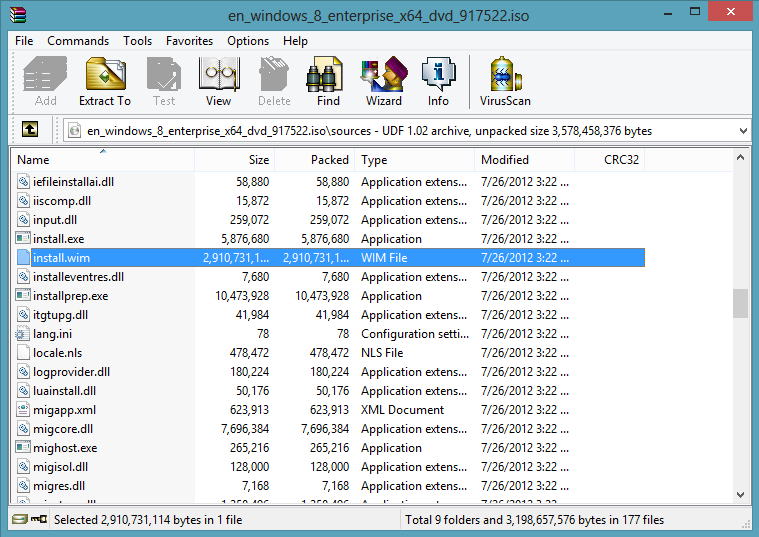
Windows 8 ISO, install.wim location

Windows 8 ISO, install.wim location

You will also need to get a copy of imagex.exe. This is not a simple file to find, you can use Windows AIK but I do not like to download such a large file for a tiny program. I found this great tool called Waik Tools, this will download only the parts that you need. After you have imagex.exe copy it to the same location as your install.wim file.

We can now install Windows on to the drive, to do this run the following command. (change drive letters and paths to what you have set your self)
imagex.exe /apply c:\temp\install.wim 1 W:

After this has run you need to create to boot records on the drive, run the following command.
bcdboot.exe W:\windows /s W: /f ALL

The drive will work properly at this point but it still needs two more changes to make it shine. You will need to apply a SAN policy to take the internal drives offline preventing any changes to the internal drives. This is done by creating a file called san_policy.xml and placing it in the root of the drive with the following contents.

<?xml version='1.0' encoding='utf-8' standalone='yes'?>
<unattend xmlns="urn:schemas-microsoft-com:unattend">
 <settings pass="offlineServicing">
 <component
 xmlns:wcm="http://schemas.microsoft.com/WMIConfig/2002/State"
 xmlns:xsi="http://www.w3.org/2001/XMLSchema-instance"
 language="neutral"
 name="Microsoft-Windows-PartitionManager"
 processorArchitecture="x86"
 publicKeyToken="31bf3856ad364e35"
 versionScope="nonSxS"
 >
 <SanPolicy>4</SanPolicy>
 </component>
 <component
 xmlns:wcm="http://schemas.microsoft.com/WMIConfig/2002/State"
 xmlns:xsi="http://www.w3.org/2001/XMLSchema-instance"
 language="neutral"
 name="Microsoft-Windows-PartitionManager"
 processorArchitecture="amd64"
 publicKeyToken="31bf3856ad364e35"
 versionScope="nonSxS"
 >
 <SanPolicy>4</SanPolicy>
 </component>
 </settings>
</unattend>

After you have placed this file in the root of the drive run this command: (this command only works on Windows 8)
dism.exe /Image:W:\ /Apply-Unattend:W:\san_policy.xml

You will now want to create an answers file that will disable the Windows Recover Enviroment for the drive. Create a file called unattended.xml with the following contents.

<?xml version="1.0" encoding="utf-8"?>
<unattend xmlns="urn:schemas-microsoft-com:unattend">
 <settings pass="oobeSystem">
 <component name="Microsoft-Windows-WinRE-RecoveryAgent"
 processorArchitecture="x86"
 publicKeyToken="31bf3856ad364e35" language="neutral"
 versionScope="nonSxS"
 xmlns:wcm="http://schemas.microsoft.com/WMIConfig/2002/State"
 xmlns:xsi="http://www.w3.org/2001/XMLSchema-instance">
 <UninstallWindowsRE>true</UninstallWindowsRE>
 </component>
 <component name="Microsoft-Windows-WinRE-RecoveryAgent"
 processorArchitecture="amd64"
 publicKeyToken="31bf3856ad364e35" language="neutral"
 versionScope="nonSxS"
 xmlns:wcm="http://schemas.microsoft.com/WMIConfig/2002/State"
 xmlns:xsi="http://www.w3.org/2001/XMLSchema-instance">
 <UninstallWindowsRE>true</UninstallWindowsRE>
 </component>
 </settings> 
</unattend>

Save this file as unattended.xml to the sysprep folder on the drive. (W:\Windows\System32\sysprep\)

You should now be ready to use your drive. all you need to do now is boot from it. The first time you boot to the drive on a new computer it will take some time to setup but after that it will be a lot faster to boot.
SBS 2011 Backups Failing

Recently I was working on a SBS 2011 box and the system would not let me make changes to Shadow copies for the drives. I would make a change to the settings and it would report an error and would not save my settings. After poking at the system a bit I found that the VSS services have reported an issue.

Level: Warning
Source: VSS
Event ID: 8230
Log Name: Application
Volume Shadow Copy Service error: Failed resolving account spsearch with status 1376. Check connection to domain controller and VssAccessControl registry key. Operation: Initializing Writer Context: Writer Class Id: {368753ec-572e-4fc7-b4b9-ccd9bdc624cb} Writer Name: TS Gateway Writer Error-specific details: Error: NetLocalGroupGetMemebers(spsearch), 0x80070560, The specified local group does not exist.

The system had added SharePoint Users to the VSS registry entries. Running the SharePoint update with force cleared this error.

  1. Open an Administrative command prompt
  2. Change directory to C:\Program Files\Common Files\Microsoft Shared\Web Server Extensions\14\BIN
  3. Run “PSConfig.exe -cmd upgrade -inplace b2b -force -cmd applicationcontent -install -cmd installfeatures”